Appendix B - NTMS Map Layout Guides and associated Marginalia Information
1. Introduction
The following information relates to the Layout Guides provided for the 1:250 000 and 1:100 000 mapping series. The guides should be used in conjunction with the specified sheet sizes, (see Appendix H). The guides are supplemented by the following detailed specifications of the Marginalia and map elements.
Colours are to be shown in accordance with the CMYK four colour process (ie. combinations of Cyan, Magenta, Yellow and Black).
For the following Layout diagrams and associated Marginalia diagrams, the applicable colours are specified according to their CMYK configuration eg. Black (C 0% M 0% Y 0% K 100%)
2. Layout Guides
1:250 000 Landscape and Portrait Guides
These Guides will be supplied in PDF format.
This Guide will be supplied in PDF format.
Users please note: The supplied Layout Guides are subject to change, and may be altered at the discretion of Geoscience Australia with respect to map Legend content, symbology etc.
3. Magnetic Declination Diagram
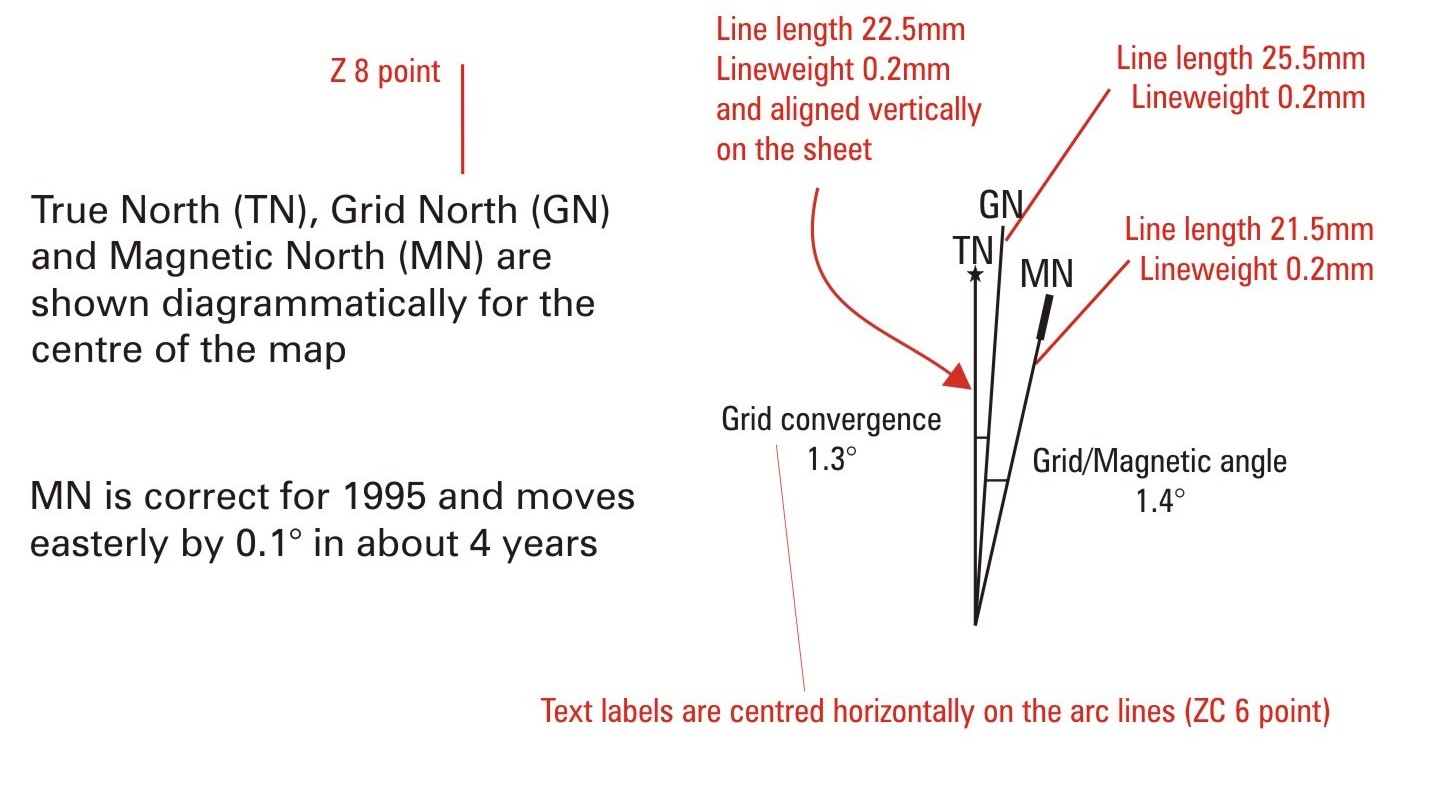
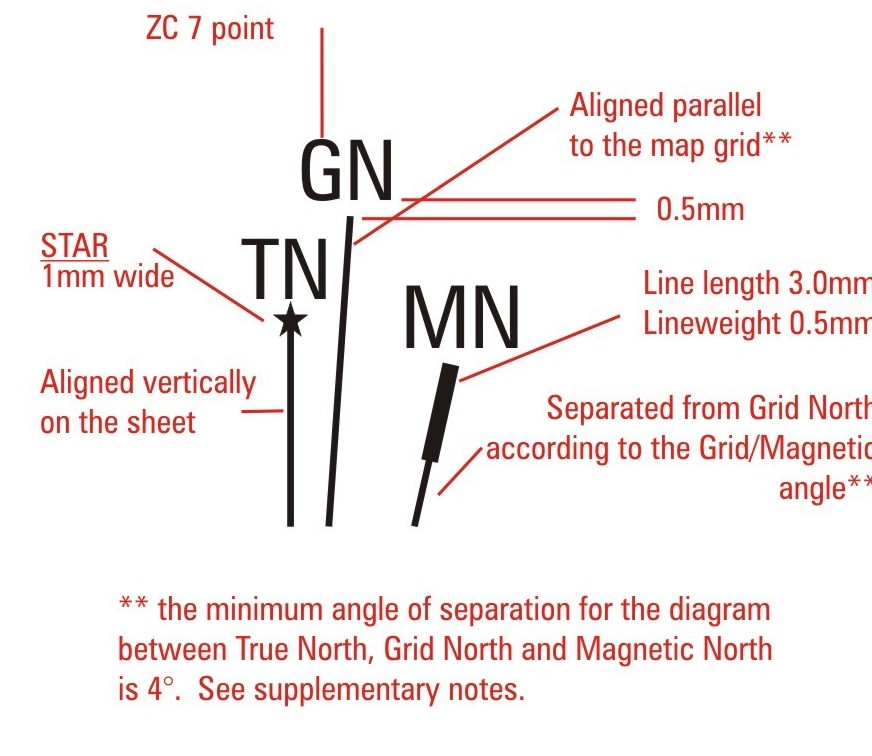
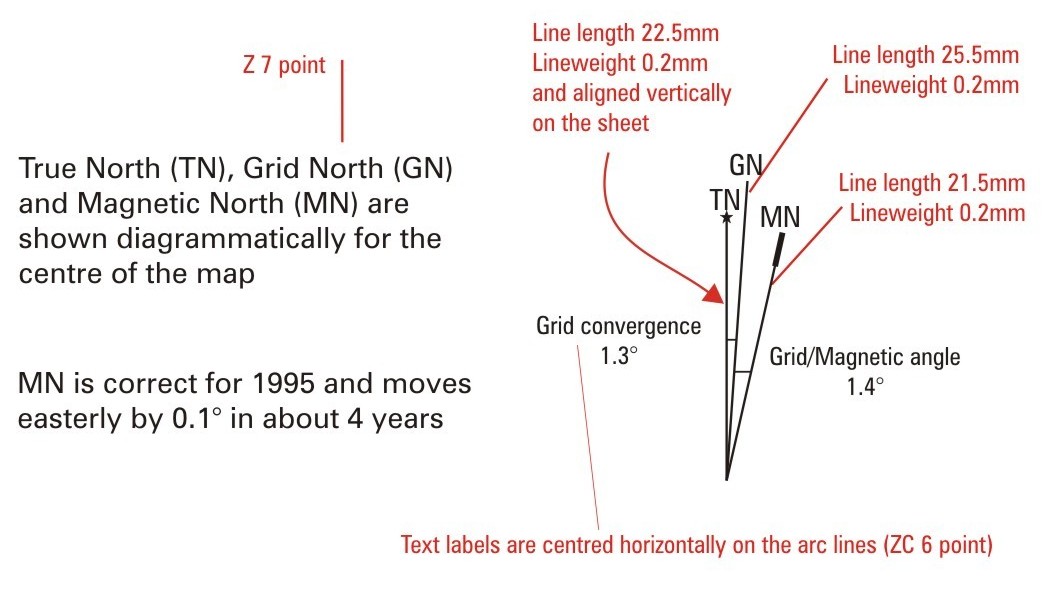
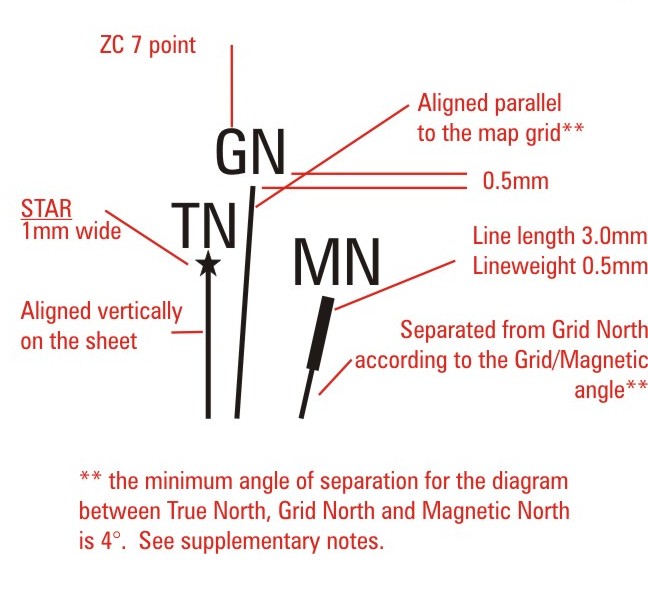
This diagram appears with True North (TN), Grid North (GN) and Magnetic North (MN) values based on, and true for, the centre of the map sheet.
Note: See the respective Map Layout Guides for position within the Marginalia
1:250 000 Scale Diagram
BLACK (C 0% M 0% Y 0% K 100%)
1:100 000 Scale Diagram
BLACK (C 0% M 0% Y 0% K 100%)
Text
Where the Magnetic North line coincides with the Grid North or True North line, 'MN' will be offset to the side. If necessary the text 'Grid/Magnetic angle' and 'Grid convergence' will be moved horizontally from their indicated position to avoid clashing with the lines in the diagram. The grid/magnetic angle label is placed on the left side of the diagram when the MN is west of TN. In this instance the diagram may be moved to accommodate the longer grid/magnetic angle label.
The abbreviations for Magnetic North, True North and Grid North (MN, TN and GN) will be centred above their respective lines and offset by 0.5 mm.
Where the movement of magnetic declination is very small (less than 0.1° in ten years), the following words are used:
MN is correct for (year) and moves
easterly (or westerly) by less than 0.1° in 10 years
Line Offsets
The magnetic declination diagram is only a representative portrayal of the magnetic declination variance. For clarity it will often be necessary to exaggerate the angles between the lines. The overriding principle is that the diagram shows the lines in their correct relative positions and that an attempt has been made to represent the angles as well as possible.
Where the angle between any two lines is less than 0.05° they are shown as coincident.
The minimum angle between GN, TN or MN is 4°. Where the angle between any two lines is <4°, the lines are shown 4° apart.
The MN line will be shown at its correct angle to TN if it is greater than 4 degrees from TN and the GN line is not between TN and MN. (Note: the projection is such that GN will always be within 4 degrees of TN.)
4. Climatic Graphs
This graph depicts the average monthly rainfall figures and average monthly minimum and maximum temperatures for the local area.
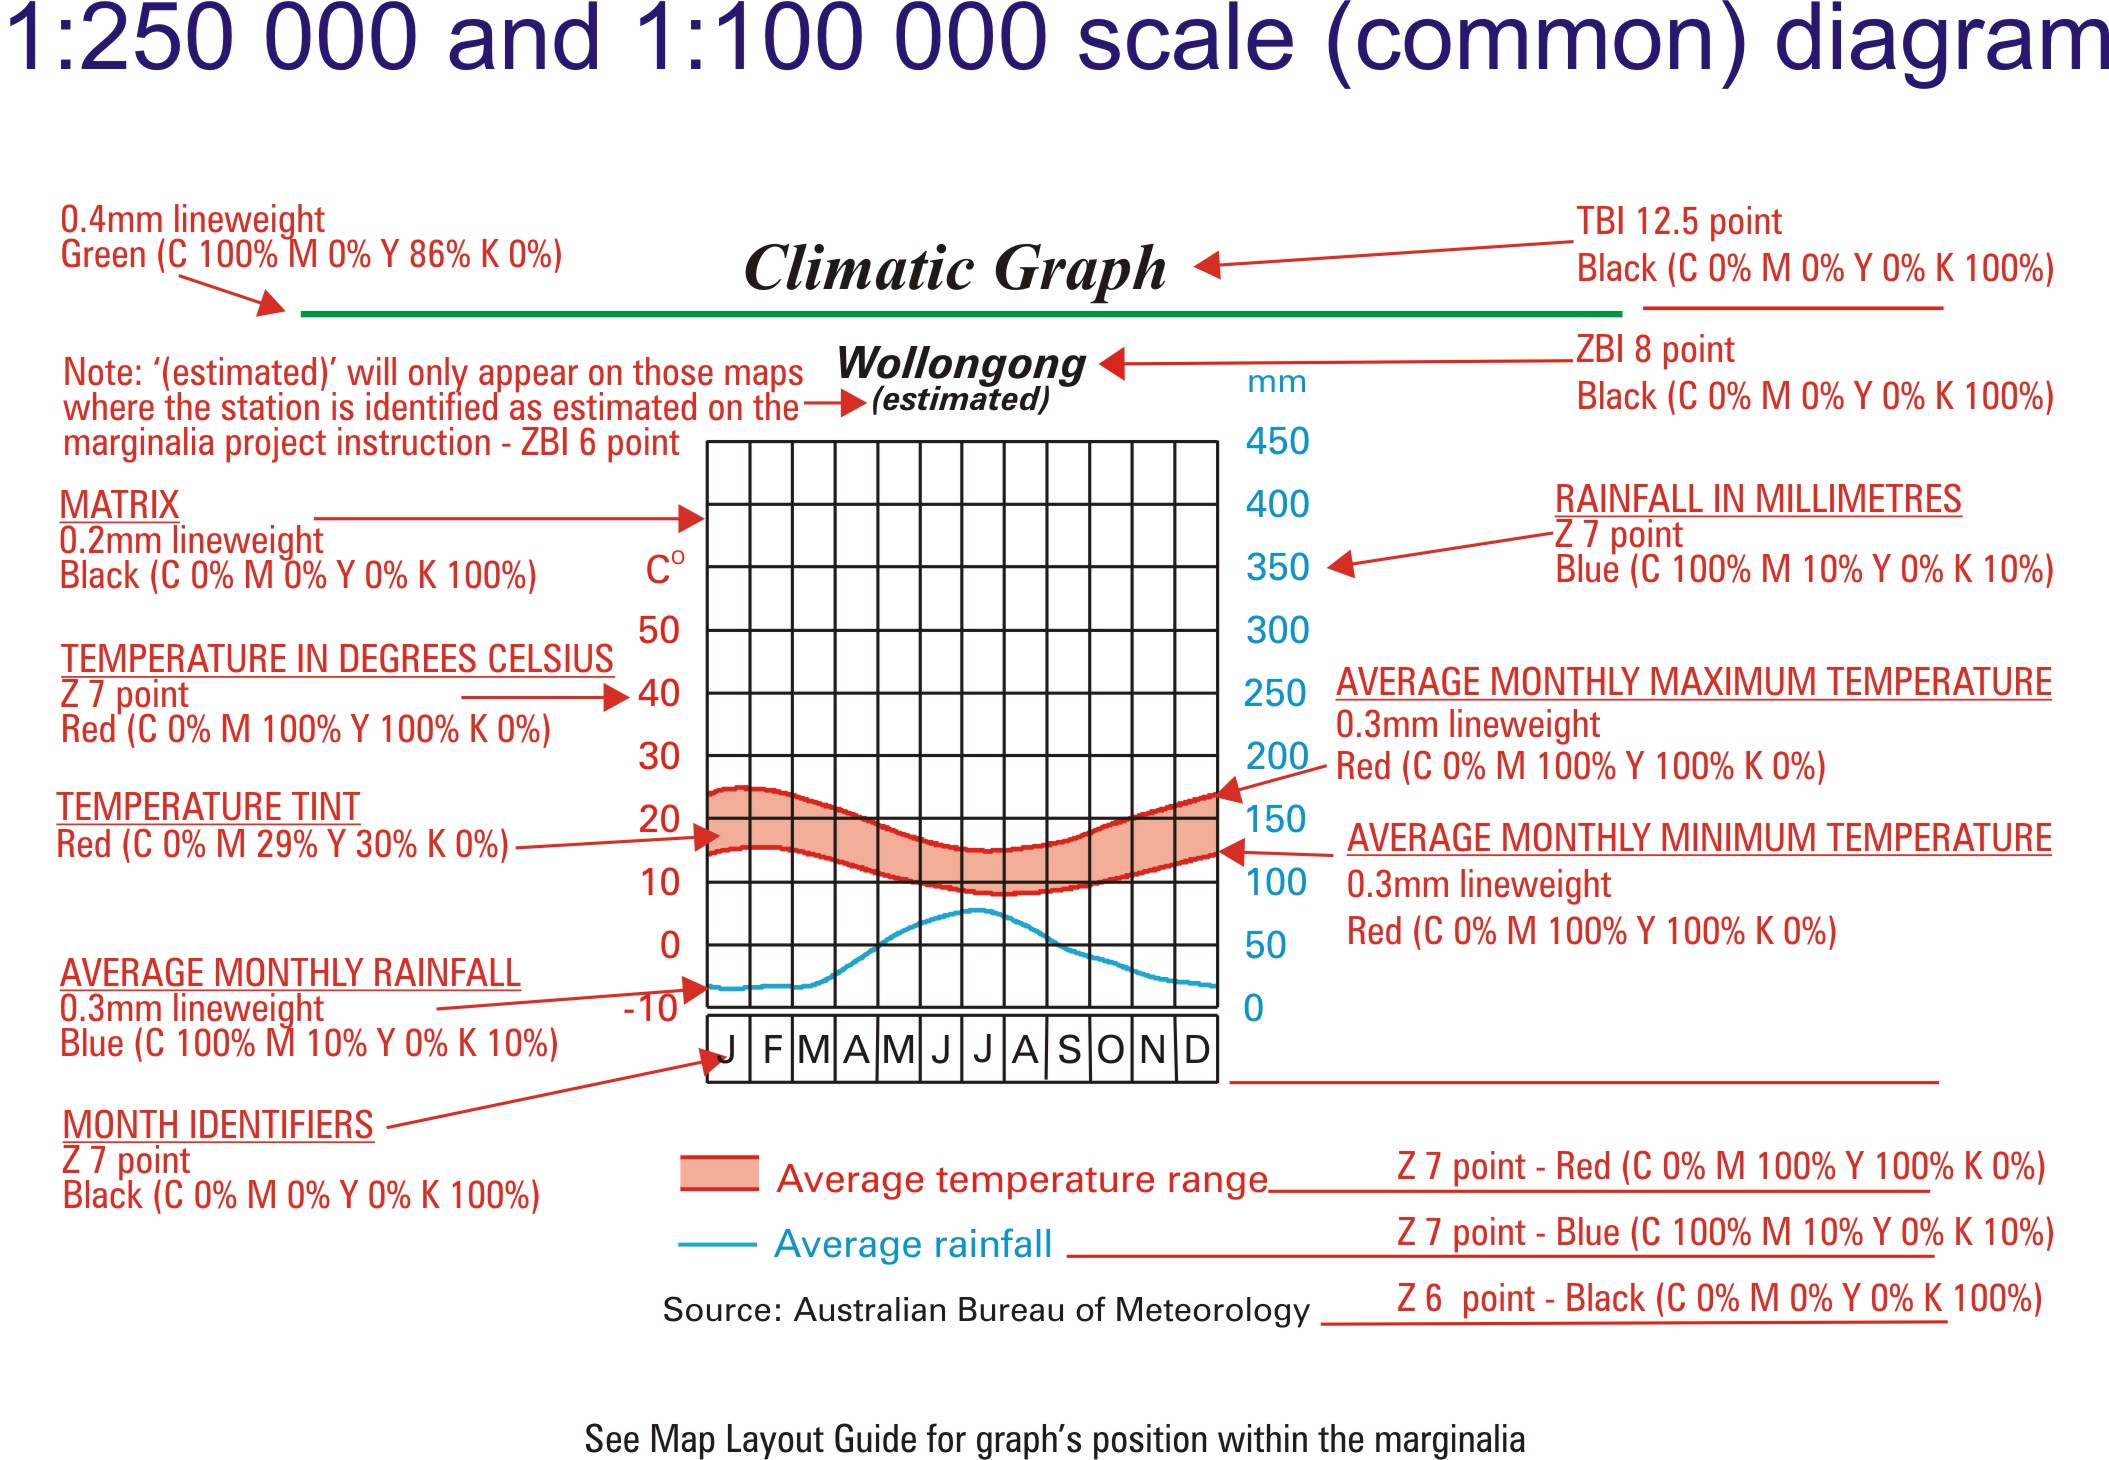
There will be either one or two Climatic Graphs appearing in the marginalia of the 1:250 000 map depending on the geographic location of the sheet. Those maps representing areas subject to different regional climatic variations will have two graphs. For the 1:100 000 map, only one Climate Graph will appear in the marginalia. The graph itself is divided into squares representing each of the twelve (12) recording months, January to December in the X direction and the Temperature and Rainfall measures in the Y direction.
4.1 Matrix Specifications
Values Matrix
Width (X direction) : 2.7 mm x 12 = total of 32.4 mm
Depth (Y direction -) : 4.0 mm x 9 = total of 36 mm
A gap of 0.5 mm (centre to centre of respective lines) is shown between the bottom line of the main graph matrix and the top line of the squares representing the individual Month's boxes at the bottom of the graph.
Month's box
Width (X direction) : 2.7 mm x 12 = total of 32.4 mm
Depth (Y direction) : 3.5 mm x 1 = total of 3.5 mm
4.2 Temperature / Rainfall lines and screen
Temperature
The left edge of the graph represents the temperature in degrees Celsius, ranging from minus 10° to 50° in 10 degree intervals from the bottom of the primary matrix. Each of the horizontal lines represents 10 degrees.
The Average Maximum and Minimum temperatures for each month of the year are recorded across the matrix, and are represented by two curved lines separated by a screened area.
The average Maximum and Minimum values are plotted by measuring vertically against the Temperature scale (Western edge of matrix) and at the central horizontal position of each of the respective Month boxes.
Due to the figures being plotted in the centre of each box, it is necessary to calculate a value at the extreme Left and Right edges of the matrix to allow the temperature lines to finish correctly. To achieve this for both edges, the temperatures for December and January are averaged and that value plotted.
The screened area will not be masked for the rainfall line.
Rainfall
The left edge of the graph represents rainfall in millimetres, ranging from 0 to 450mm in 50mm intervals from the bottom of the primary matrix. Each of the horizontal lines represents 50mm.
The Average Rainfall figures are shown for each month across the matrix, and are represented by a single line. The figures are plotted by measuring vertically against the Rainfall scale (Left edge of matrix) and at the central horizontal position of each of the respective Month boxes.
Due to the figures being plotted in the centre of each box, it is necessary to calculate a value at the extreme Left and Right edges of the matrix to allow the average rainfall line to finish correctly. To achieve this for both edges, the average rainfall for December and January are averaged and that value plotted.
Where a monthly rainfall value exceeds 450 mm the rainfall line will be drawn to meet the 450 mm line and then break. The line will then reappear when the values again fall within the range of the graph. Between the plotted monthly values and the 450 mm line the angle of the rainfall line will indicate the magnitude of the next month's value. For example, if February's value is 440 and March's value is 455 the rainfall line will meet the 450 mm line close to the centre of the March box but if
March's value is 550 the rainfall line will meet the 450 mm line within the February box.
5. Grid Reference Diagram
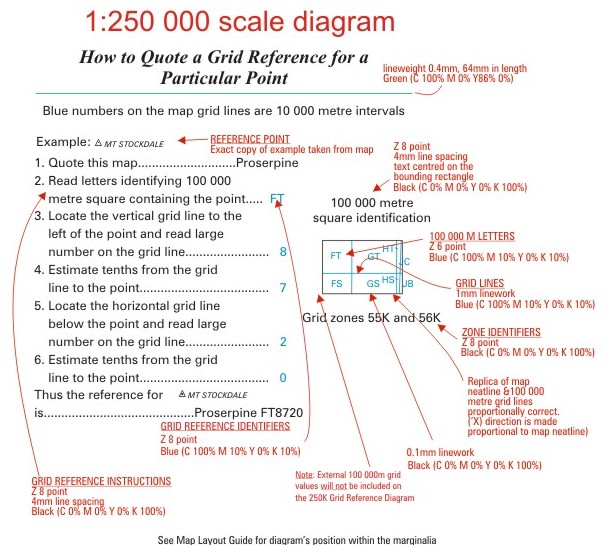
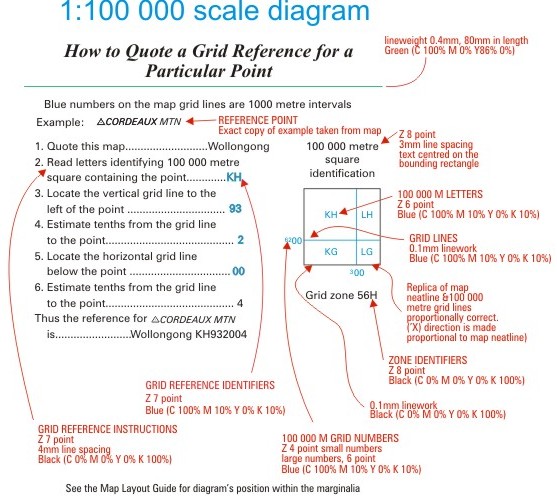
This is diagram in the map marginalia with an example reference point taken from the face of the map.
Example Reference Point
The figures for the Grid Reference Diagram are determined from a predetermined reference point on the face of the Map. The example will be a named point feature, preferably a named hill (no associated elevations will be included however). If a Horizontal Control Point is chosen as the reference point, the name or code will appear, but not the associated spot elevation value. If a Locality Mountain/Hill is chosen, the name code will appear but not the associated spot elevation value. When
choosing an example, it is preferable to select a point in an area clear of other detail.
If no named point feature exists on the map the smallest named area feature will be used with reference to the feature's centre. An unnamed Spot elevation is not a suitable point. When choosing an example, it is preferable to select a point in an area clear of detail. The values are positioned against the relevant numbered sections of the reference table.
An exact copy (ie. same name, size, typestyle, and symbol) of the example Reference Point is taken from the map and shown in the same relationship to the reference symbol (eg spot elevation, horizontal control point etc). It is preferable that the name is shown to the right of the reference symbol.
Full Reference Point
This reference is a combination of the Map name, followed by a letter space and the concatenated identification letters and numbers from the preceding individual references.
100 000 metre square identification
The bounding rectangular line is geographically correct to scale (replicates the tile neatline) and is proportionally correct when reduced down to the final diagram scale of 1:10 000 000 (for 1:250 000 scale) and 1:3 500 000 (for 1:100 000 scale).
The bounding rectangle should be placed in alignment with the marginalia panel.
The position of the zone boundary lines are also a scaled reduction of the actual 100 000 metre grid line positions. These lines are plotted in the same projection as the map.
The MGA 100 000 Metre Square Identification Guide (diagram for the identification of letters applicable to the map sheet) will be supplied in PDF format.
100 000 Metre Grid Identifiers (1:100 00 scale only)
The Grid Reference diagram at 1:100 000 scale will only show the 100 000 metre grid identifiers which fall within the diagram box. i.e. If a 100 000 metre grid line coincides with the map neatline, the identifier outside the map neatline will be shown on the face of the map but not shown (ie. repeated) on the grid reference diagram.
Grid Zone
Where a map sheet (including the 1:250 000 bleed edge) straddles more than one grid zone, the grid zones will be listed in the grid reference diagram if the grid zones are labelled on the face of the map. One and two zones will be on a single line, three or four zones will be on two lines as follows:
Grid Zones
55J, 56J, 57J and 58J
6. Map of Australia
This map shows the individual map location 'box'. This graphic is part of the map front cover marginalia.
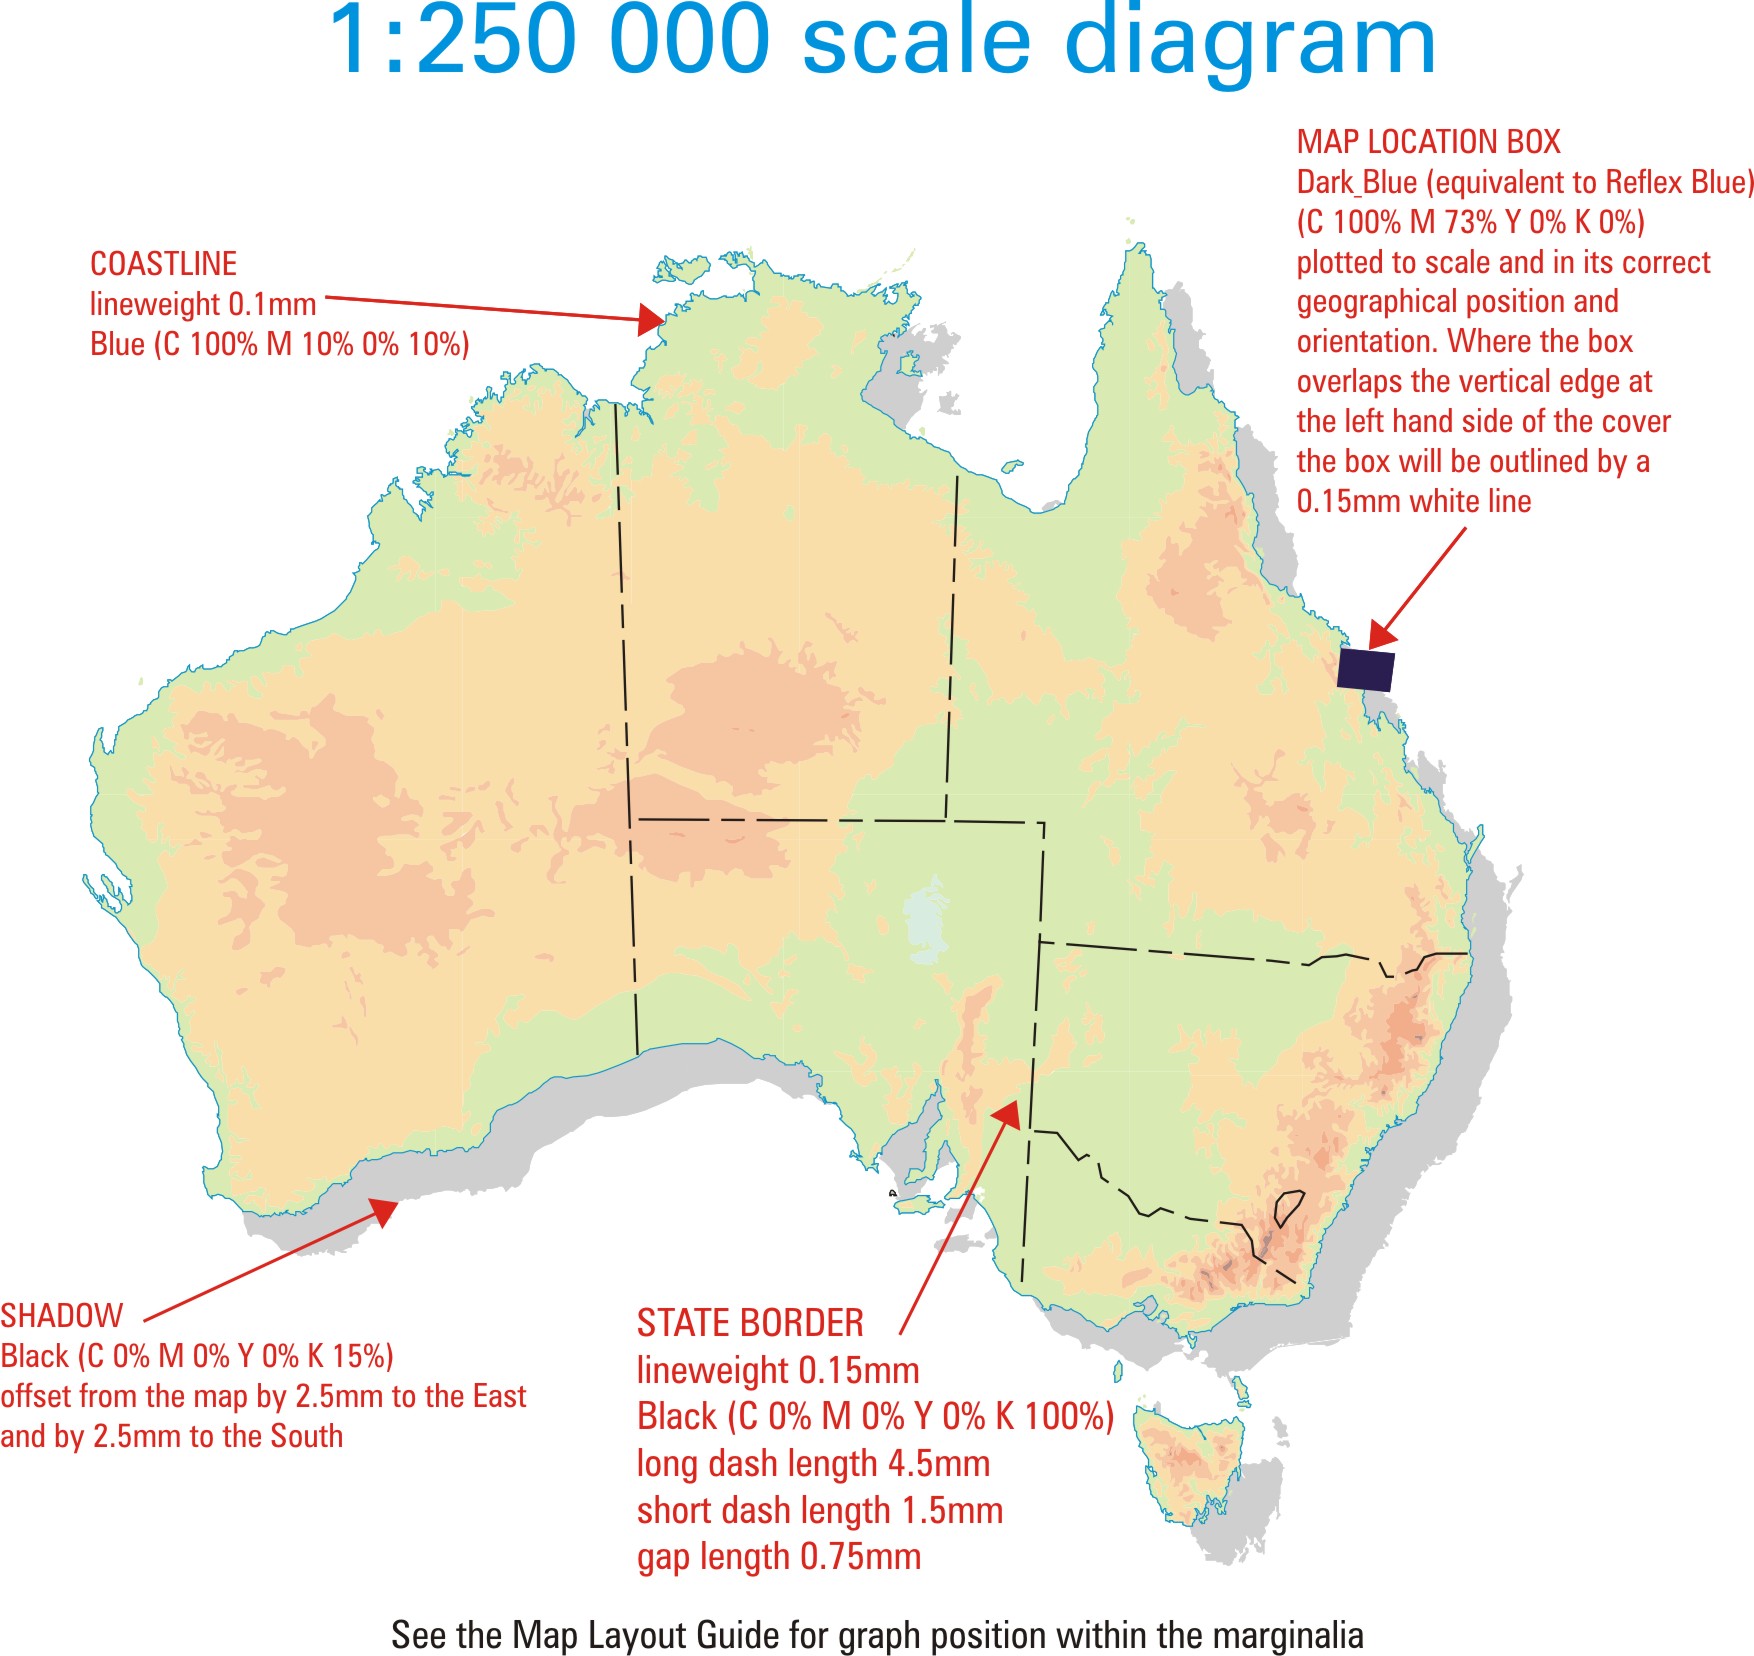
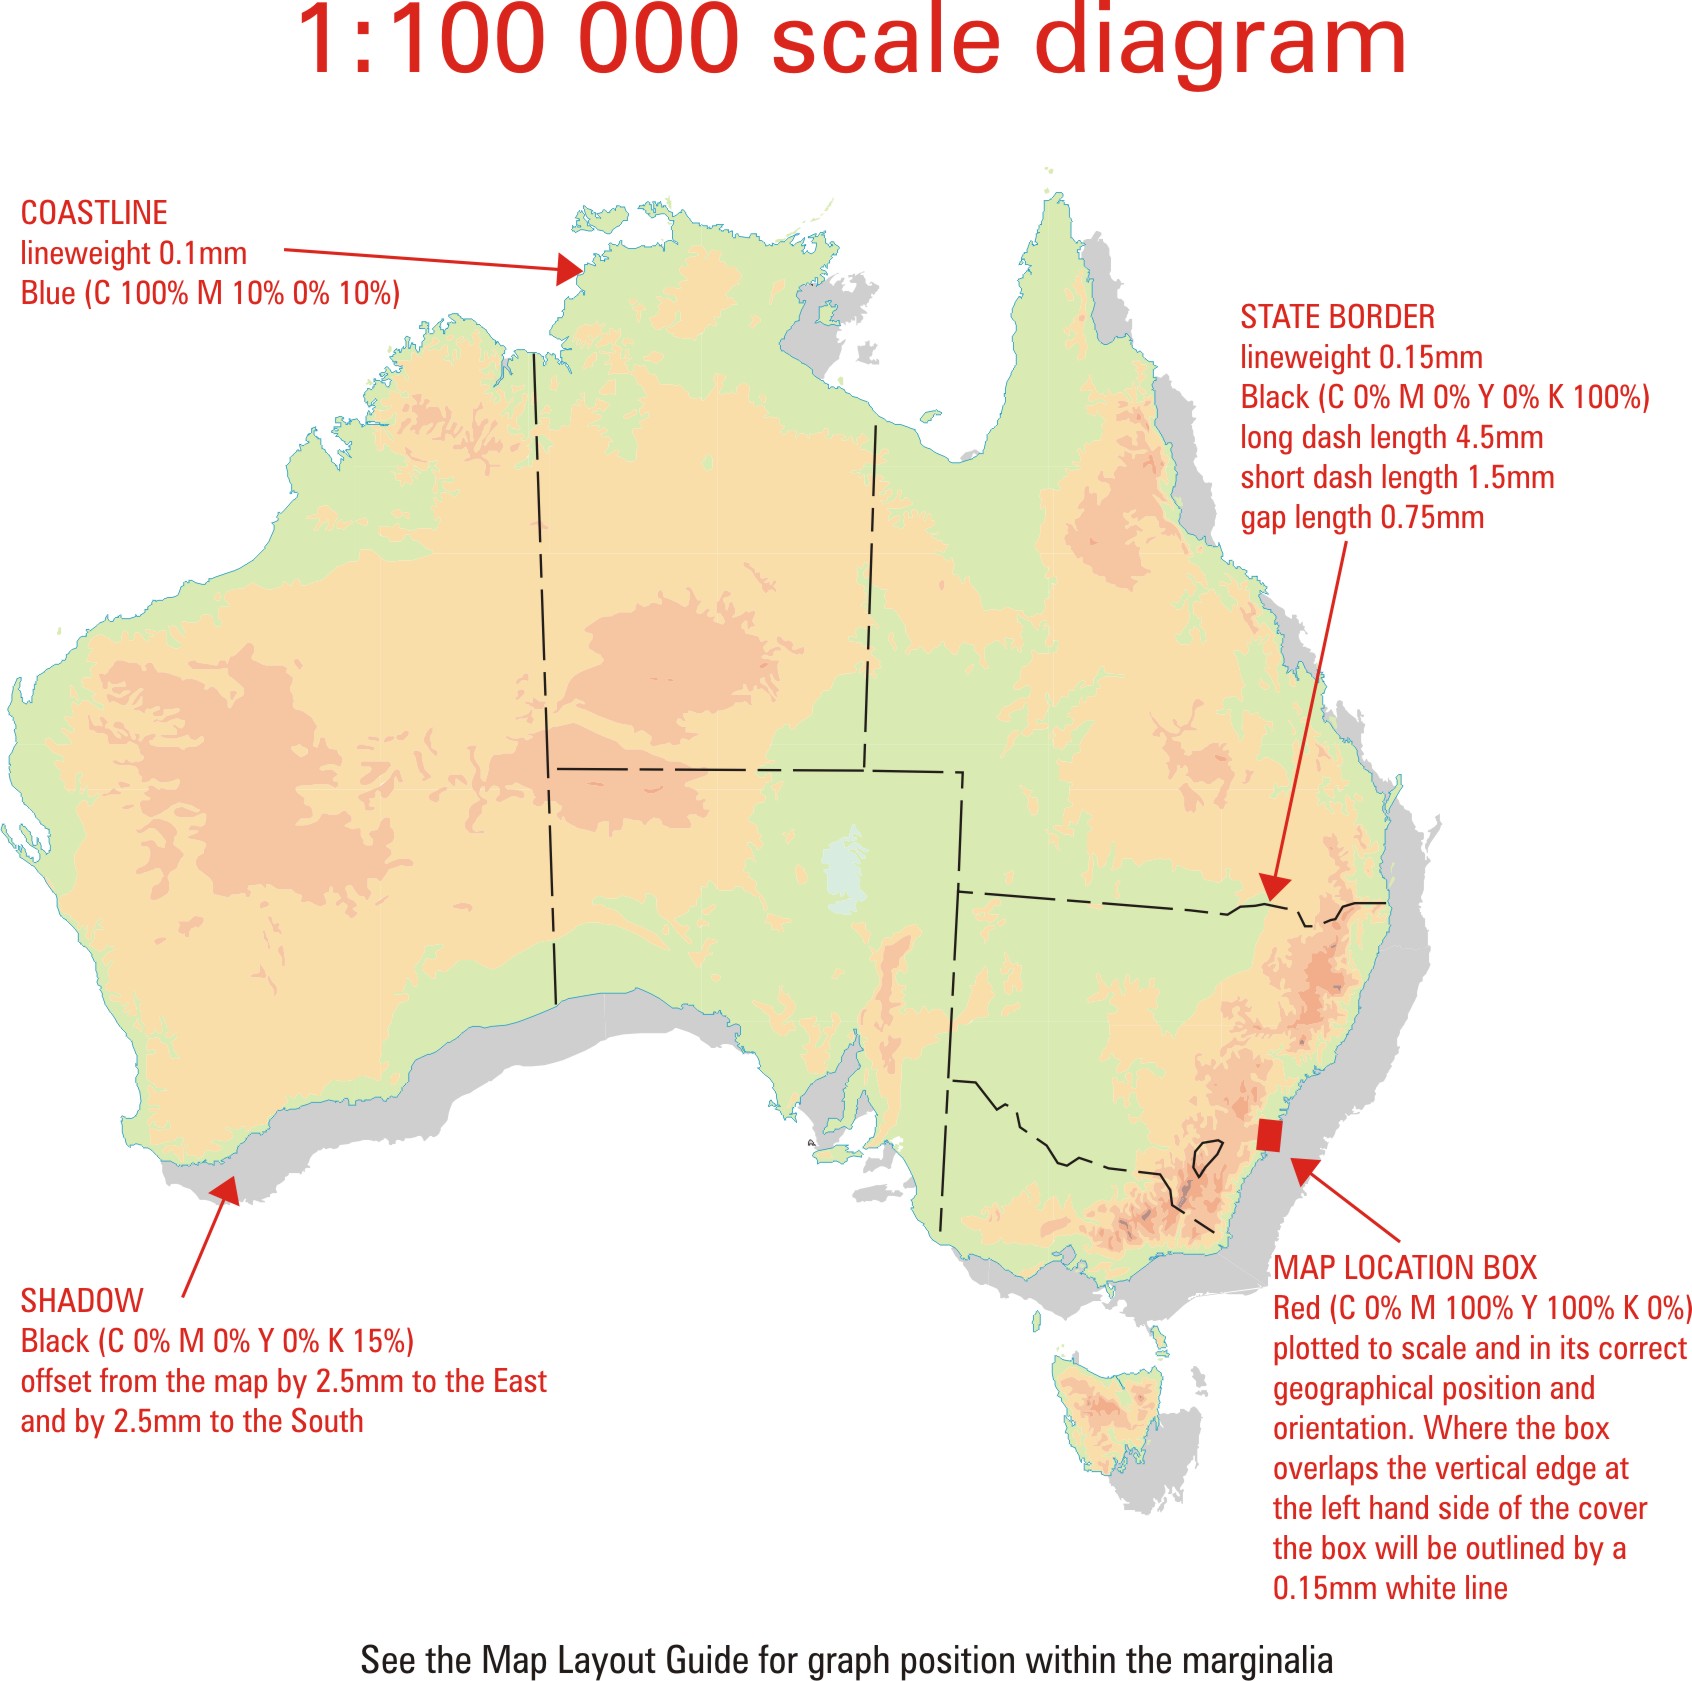
The map is drawn at a scale of 1: 45 000 000 on a Lambert Conformal Conic Projection, with Standard Parallels at 18 and 36 degrees, and Central Meridian at 135 degrees West longitude.
| ELEVATION RANGE (in metres) |
COLOUR | CMYK PERCENTAGE | ANGLE | DENSITY | |||
|---|---|---|---|---|---|---|---|
| C | M | Y | K | ||||
| -200 to 0 | Blue Yellow |
10% 0% |
0% 0% |
0% 10% |
0% 0% |
1050 900 |
150 dpi 150 dpi |
| 0 to 200 | Blue Yellow |
10% 0% |
0% 0% |
0% 30% |
0% 0% |
1050 900 |
150 dpi 150 dpi |
| 200 to 500 | Red Yellow |
0% 0% |
10% 0% |
10% 30% |
0% 0% |
750 900 |
150 dpi 150 dpi |
| 500 to 1000 | Red Yellow |
0% 0% |
20% 0% |
20% 30% |
0% 0% |
750 900 |
150 dpi 150 dpi |
| 1000 to 1500 | Red Yellow |
0% 0% |
30% 0% |
30% 40% |
0% 0% |
750 900 |
150 dpi 150 dpi |
| 1500 and above | Blue Red Yellow |
20% 0% 0% |
0% 40% 0% 0% |
0% 40% 40% |
0% 0% 0% |
1050 750 900 |
150 dpi 150 dpi 150 dpi |
7. Locality Diagram
Data for the Locality Diagram will be supplied by Geoscience Australia. This data will be used as supplied, except for the placement of text and the application of the specified symbology.
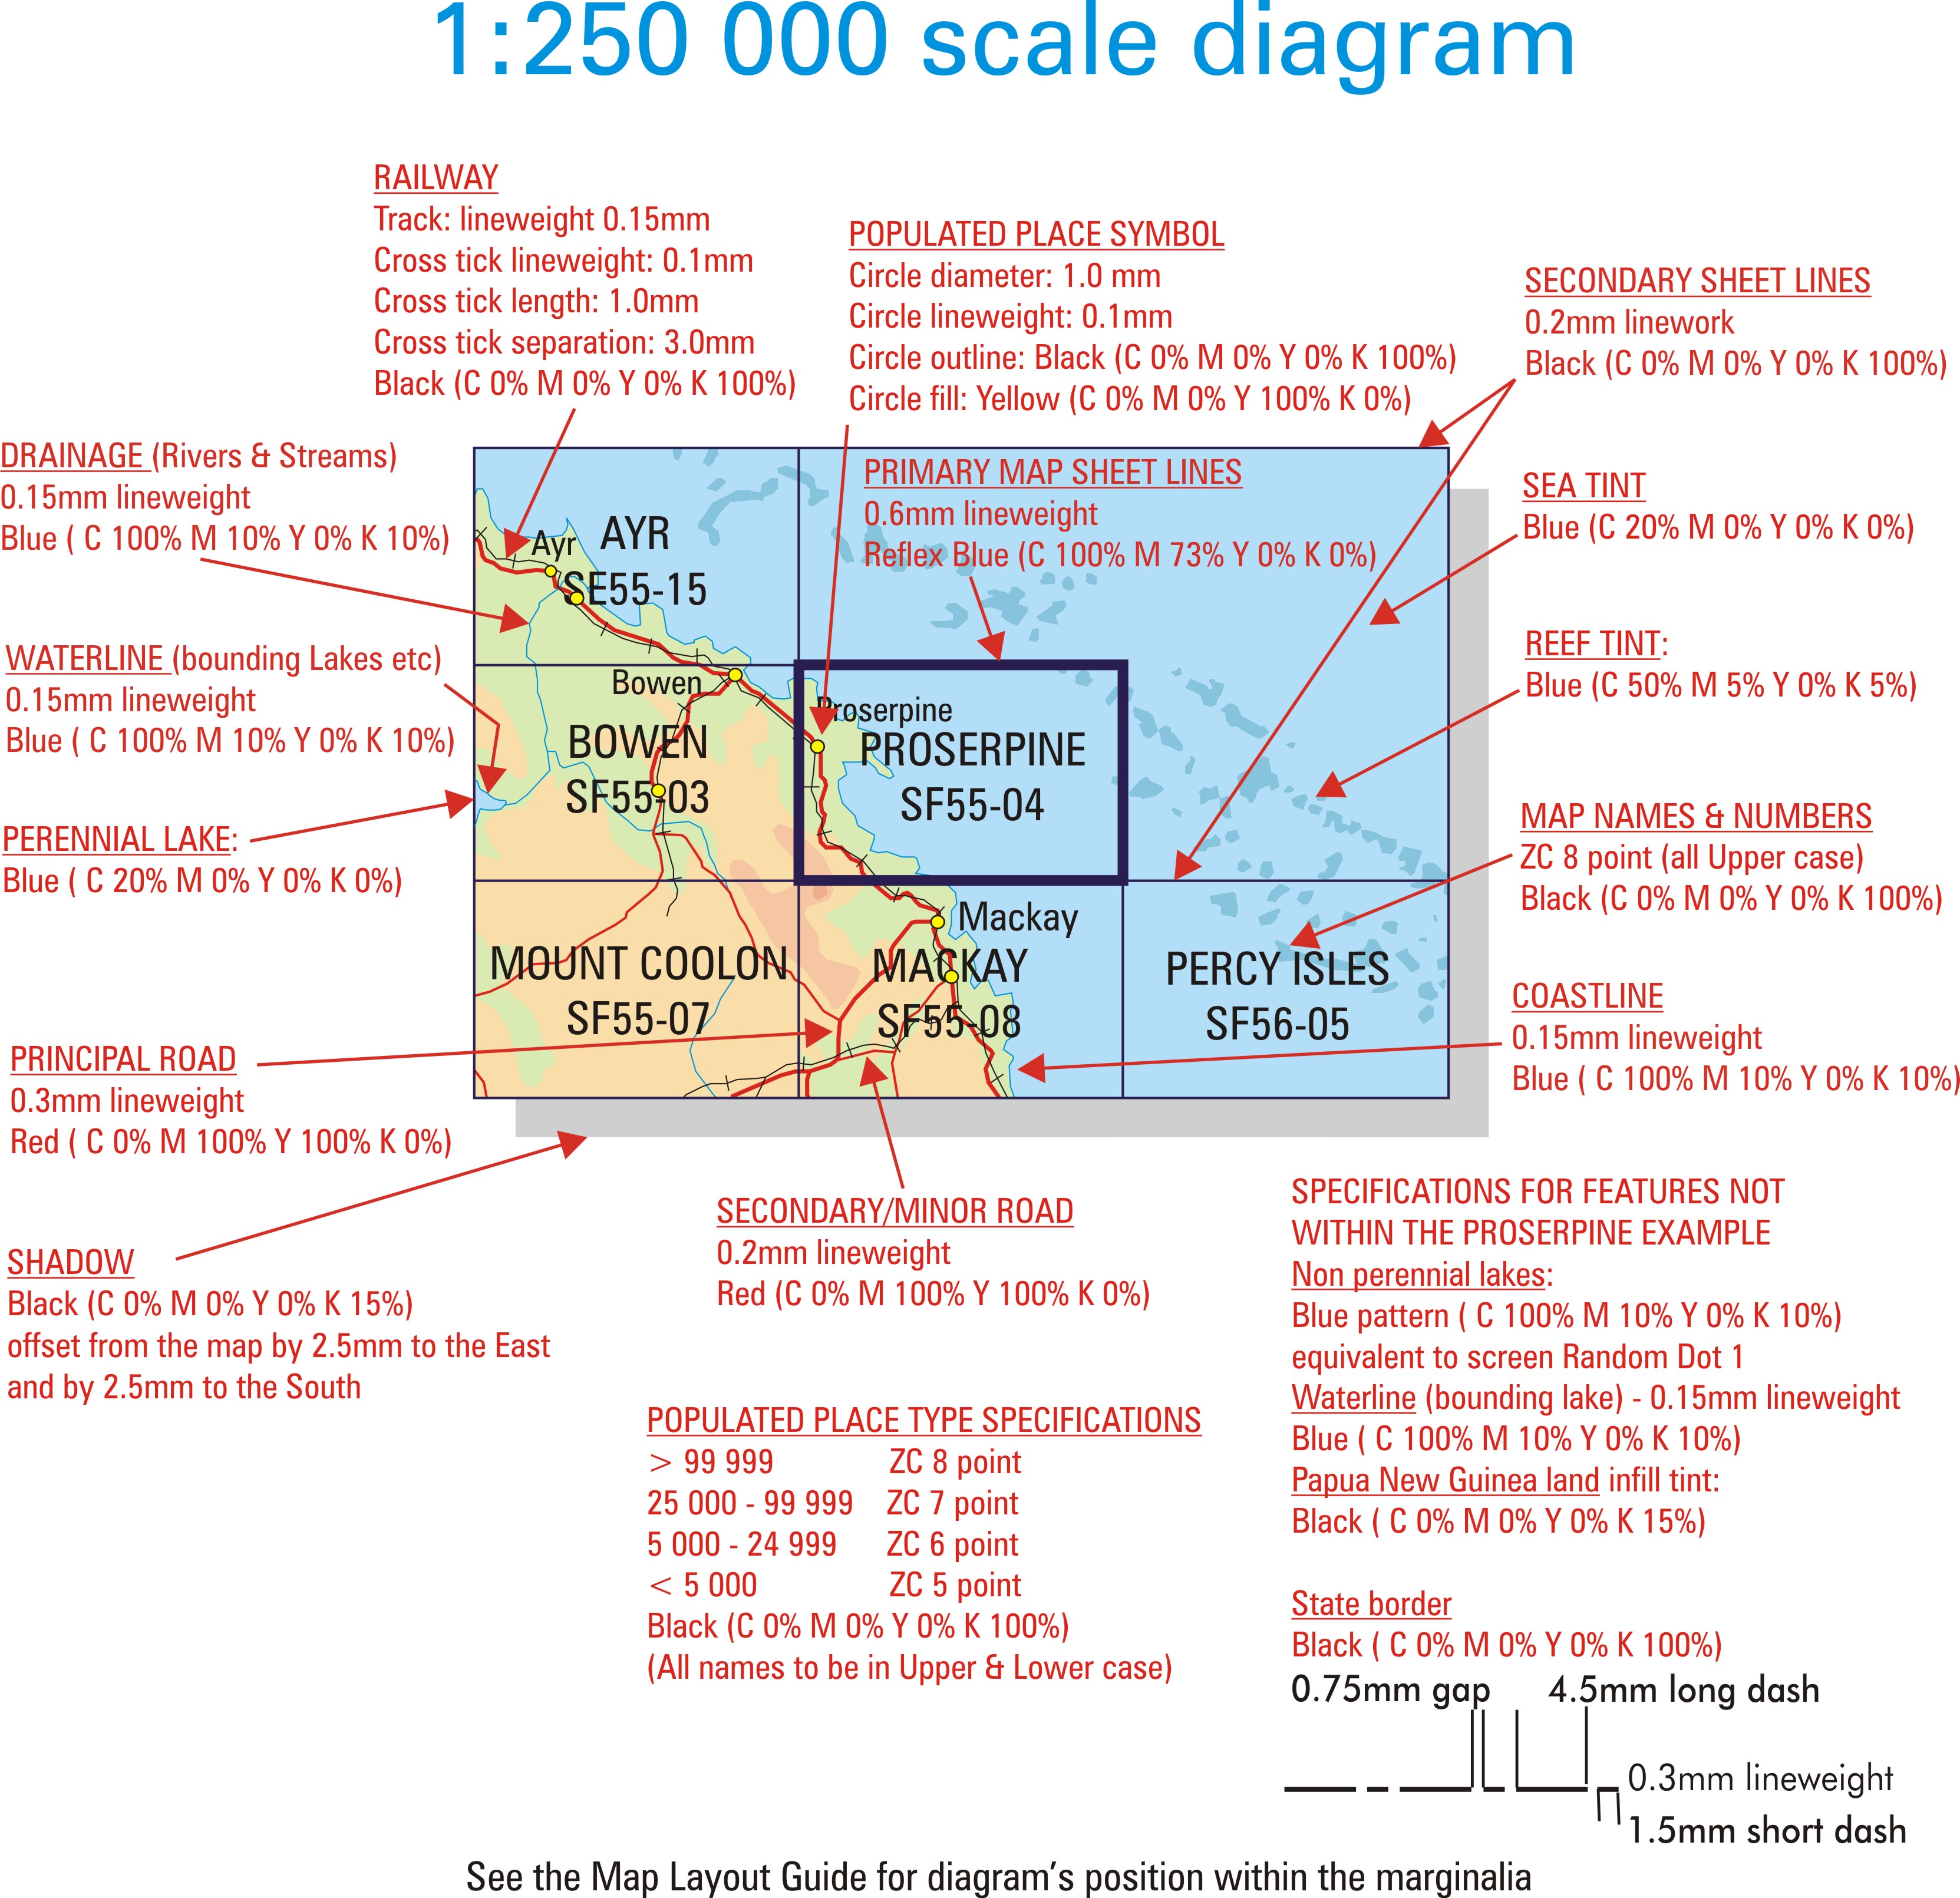

1:250 000 scale diagram extents
This diagram is unprojected, and the sheet lines and data are scaled automatically from the data set to fit in the box. The data extent is set at 4.5 degrees wide (X direction) by 3 degrees high (Y direction). This creates a "standard" 9 map diagram where the particular map area is at the centre of 9 non-adjusted maps. For adjusted sheets (see Appendix H) the map area in the diagram will be re-centred (off centre) to allow the adjacent sheets to be shown as a whole wherever possible (this
precludes having small, untidy "slivers" representing adjoining sheets where type cannot fit).
1:100 000 scale diagram extents
This diagram is unprojected, and the sheet lines and data are scaled automatically from the data set to fit in the box. The data extent is set at 1.5 degrees wide (X direction) by 1.5 degrees high (Y direction). This creates a "standard" 9 map diagram where the particular map area is at the centre of 9 non-adjusted maps. For adjusted sheets (see Appendix H) the map area in the diagram will be re-centred (off centre) to allow the adjacent sheets to be shown as a whole wherever possible (this
precludes having small, untidy "slivers" representing adjoining sheets where type cannot fit).
General
The hypsometric tints are as for the Map of Australia. Hypsometric tints will be masked for lakes.
Where map coverage ceases around the coastline, the map sheet lines will not be drawn.
Locality text placement will be unambiguous and avoid clashes with railways and state borders. Where a clash is unavoidable the railways and state borders will be broken. The break will be 0.5mm on either side of the type when it crosses the feature.
Map sheet names and numbers will be placed centrally within the map sheet lines wherever possible. Appendix G map indexes provide guidance to hyphenation of map names.
Type sizes for populated place names may be reduced by one point size in areas of clutter to aid placement. Where a clash with other type is unavoidable the populated place name and symbol may be omitted. This option should be used very sparingly and should be particularly avoided where there are few locality names on the diagram.
In remote areas where no populated places exist, very large homesteads can be depicted using Zurich 7 point type and a 0.5mm size building symbol.
A State name is not to be shown in the locality diagram. If the map sheet lines coincide with a State Border symbol, the State Border symbol and sheet line will appear coincidentally.
Masking
Railway Lines should be masked to black text.
Populated place symbols should be cleared of all screens except the yellow infill.
Hypsometric tints should be masked from Lakes and Waterbodies.
8. Graticule and Grid
8.1 Ticks on the Graticule Lines
1:250 000 Scale
Graticule lines will be shown for multiples of 15 minutes. Each line will have ticks at 1 minute intervals. Ticks will also be shown along the western and southern neat lines. Both lines and ticks will have a line weight of 0.2 mm.
Positioning of ticks will be as shown on the map layout guide. The ticks will be 1.25 mm long for 1 minute intervals. Ticks for 1 minute intervals will be on the east side of longitude lines and on the south side of latitude lines except for the southern neatline where the ticks will be on the north side.
Increments of 5 minutes will be longer lines. Where both sides of the line that the ticks cross are within the map the ticks will be centred on the line and the ticks will be 4 mm long. Along the neatline the 5 minute lines will be 2 mm long and within the map area.
1:100 000 Scale
Graticule lines will be shown for multiples of 10 minutes. Each line will have ticks at 1 minute intervals. Ticks will also be shown along all neat lines (with the exception of the external AGD66 Datum neat line shown on the northern and eastern edges). Both lines and ticks will have a line weight of 0.2 mm.
Positioning of ticks will be as shown on the map layout guide. The ticks will be 1.0 mm long for 1 minute intervals. Ticks for 1 minute intervals will be on the east side of longitude lines and on the south side of latitude lines except for the southern neatline where the ticks will be on the north side.
Increments of 5 minutes will be longer lines. Where both sides of the line that the ticks cross are within the map the ticks will be centred on the line and the ticks will be 4 mm long. Along the neatline the 5 minute lines will be 2 mm long and within the map area.
8.2 Graticule Values
1:250 000 Scale
Graticule values will be shown outside the neatline for all lines and along selected lines internal to the map. The following rules expand on what is shown on the layout guides. Italicised examples relate to the Landscape layout guide.
All values will be centred on the line to which they refer.
Whole degrees will always be shown in full (eg 149o00').
Graticule Values may be moved where they clash with other detail.

Values for the graticule lines forming the southern and western neatline of the map and for the graticule values on the graticule lines closest to the northern and eastern trim lines (eg 150o00') will always include the full degree and minute reference (eg: 148o30') .
 Values along the southern neatline (21o00') and along the latitude line closest to the northern trim (20o00') will be centred at seven minutes east of the westernmost longitude line wholly within the map (eg centred on 148o52') note: the neatline is not counted.
Values will be added every thirty minutes going east. At the eastern edge of the map a value will only be added if the type will fall wholly within the trim line.

Other values falling outside the neatline and to the north of the graticule line closest to the northern trim line will be shown as minutes only (eg 15').

Intersections of graticule lines that are multiples of 30' and fall within the map excluding the bleed area, will be shown as full degree and minute references (eg: 20o30')
1:100 000 Scale
Refer to the 1:100 00 Scale Layout Guide for specific instructions for the placement of Graticule values.
8.3 Internal Grid Values
1:250 000 Scale
Ladder grid values will be shown in columns and rows as per the Layout Guides.
Grid Values may be displaced along the grid line or deleted if they clash with other map detail. Displacement will not be more than one grid square interval in either direction. Deletions will be kept to a minimum.
1:100 000 Scale
Refer to the 1:100 000 Scale Layout Guide for specific instructions for the placement of internal grid values.
Colour for Grid Values (both scales)
Blue (C 100% M 10% Y 0% K 10%)
8.4 Internal 100 000 Metre Square Identification Letters
At both 1:250 000 and 1:100 000 scales, internal blue 100 000 Metre Square Identification letters on grids may be moved for cartographic reasons where any identification letter clashes with a feature or the feature in turn clashes with identification letters. While it is determined such a move is required; the unaffected letters should be offset, where no further problems are caused, to effect a symmetrical presentation of the four letters. Note: Identification letters are not to be shown outside the neatline (1:250 000 scale only). See the 1:100 000 Scale Layout Guide for treatment of these values at 1:100 000 scale.
Colour for 100 000 Metre Square Identification Letters (both scales)
Blue (C 100% M 10% Y 0% K 10%)
9. Colours for Logos, Miscellaneous Marginalia and Bar code type
1:250 000 Scale
The vertical strip at the left hand edge of the map: solid Reflex Blue (C 100% M 73% Y 0% K 0%)
'Topographic Map .....' (text at the top of the cover): solid Reflex Blue (C 100% M 73% Y 0% K 0%)
Horizontal rules under headings: Green (C 100% M 0% Y 86% K 0%)
GDA logo: Lines - Brown (C 0% M 59% Y 100% K 18%)
GDA Text - solid Reflex Blue (C 100% M 73% Y 0% K 0%)
Colour control panels: half of each block solid and half 50%
The bar code number (beneath the bar code) will be in Zurich Condensed 10pt type. The bar code will be masked out 0.7 mm back from the text.
1:100 000 Scale
The vertical strip at the left hand edge of the map: Red (C 0% M 100% Y 100% K 0%)
'Topographic Map .....' (text at the top of the cover): Red (C 0% M 100% Y 100% K 0%)
Horizontal rules under headings: Green (C 100% M 0% Y 86% K 0%)
GDA logo: Lines - Brown (C 0% M 59% Y 100% K 18%)
GDA Text - solid Reflex Blue (C 100% M 73% Y 0% K 0%)
Colour control panels: half of each block solid and half 50%
The bar code number (beneath the bar code) will be in Zurich Condensed 10pt type. The bar code will be masked out 0.7 mm back from the text.
10. Rules for map names and State names
10.1 Map Names
1:250 000 Scale
Map names will be given as in Appendix G.
Map names will not be hyphenated. With the exception of the word 'Special' the map name will be all in the same point size.
Type size:
| Length of name in Times Bold Italic at 46 point (mm) | Size to be used (points) |
|---|---|
| <79 | 46 |
| 79 to <90 | 40 |
| 90 to <105 | 34 |
Note: All map names should be <105mm, if a longer name is found its treatment should be referred back to Geoscience Australia.
Multiple word names
'Special' will always be on a separate line in Times Bold Italic 30 point type, see Appendix B Chapter 2. Layout Guides ('Portrait layout').
Multiple word names will be wrapped onto a second line before being reduced in point size. However, multiple word names will be reduced in point size to accommodate long individual words.
Placement of Text
Horizontal alignment: Text for the title (including 'Special' if applicable) and the state reference will start 20mm from the trim line.
Vertical alignment: One and two line names, the base of the first line will be 210 mm from the bottom trim. For specials the base of the 'Special' will be 10 mm from the bottom of the preceding line. See Appendix B Chapter 2. Layout Guides . For two line names which are not specials the base of the second line will be standard line spacing from the first line.
Three line names: Only specials will run to three lines. A name which is not a special and does not fit on two lines at 34 or 40 point size should be referred to Geoscience Australia. The top of the first line will be 228 mm from the bottom trim, the base of the second line will be standard line spacing from the first line and the base of the third line ('Special') will be 10mm from the bottom of the preceding line.
1:100 000 Scale
Refer to the 1:100 000 Scale Layout Guide for specific instructions on the rules for size and positioning of Map names at 1:100 000 scale
10.2 State names
1:250 000 Scale
Where the map sheet (including the bleed edges) falls wholly within one state or territory the state or territory name will be shown. Where the map sheet (including the bleed edges) depicts land from more than one state or territory the names of all states and territories will be shown.
State names will appear with the map name on the cover and at the lower right of the sheet (Appendix B Chapter 2. Layout Guides).
The base of the State name will be 8mm from the base of the preceding line. The base of the second line of State names (if required) will be 6mm from the base of the first line.
1:100 000 Scale
Refer to the 1:100 000 Scale Layout Guide for specific instructions on the rules for positioning State names at 1:100 000 scale
11. Road Destination Arrows
1:250 000 Scale
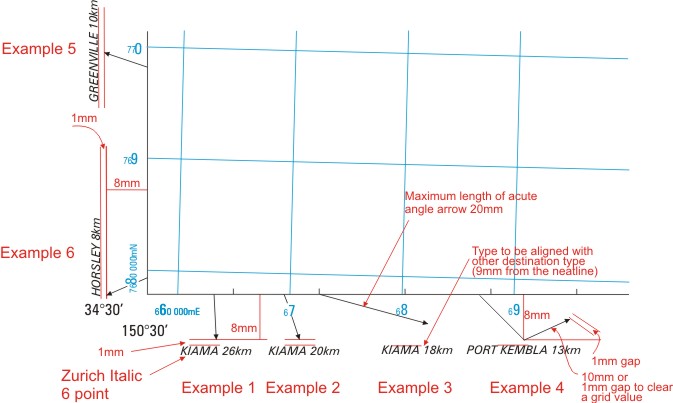
Maximum distance from neatline: 8mm perpendicular to the neatline (Examples 1 and 5). Where this would result in an arrow greater than 20mm in length it is to be treated as an acute angle arrow.
Acute angle arrows: Maximum length of 20mm (Example 3).
Bent Arrows (where the direction to the destination does not allow the arrow to be shown as a straight line): A line, symbol number 42 will be drawn 45o to the neatline out to 8mm perpendicular to the neatline. The second line, symbol 255, will be 10mm long drawn in the direction of the destination (Example 4).
Text placement: 1mm gap from the arrow to the top or bottom of the type. For most cases type will be centred on the arrow head. However, for Example 4 it will be centred on the 'elbow'. Type may be moved off centre to avoid clashes.
Arrow clashes with grid value: The line will have a 0.2mm gap either side of the grid type (Examples 2 and 6).
Insufficient space between the road and the trim line: the road destination arrow and the text will be omitted.
Where the type or arrow unavoidably clashes with graticule values: See example 6 where the Graticule Value and destination type have been displaced to accommodate road destination type and the destination arrow.
1:250 000 scale examples:
1:100 000 Scale
Refer to the 1:100 000 Scale Layout Guide for specific instructions on the rules for positioning Road Destinations Arrows, Destination names and associated distances at 1:100 000 scale.
Topic contact: mapfeedback@ga.gov.au Last updated: January 20, 2012
